Introduction
As someone experimenting with open networking, I wanted a low-cost way to get hands-on with IP Infusion’s OcNOS — without a rack of hardware. My goal was simple: get OcNOS running with ContainerLab in a home setup that anyone could replicate, ideally for under $400.
This blog documents the hardware and software choices I made, a few roadblocks, and how I ultimately got a working network lab on a miniPC using ContainerLab, vrnetlab, and OcNOS.
1. Core Requirements
Before diving into setup, these are the essentials:
- Nested virtualization support (hardware and OS)
- ContainerLab and installation guide
- vrnetlab to convert .qcow2 images into Docker containers
- An OcNOS .qcow2 image (from IP Infusion)
⚡ Tip: Nested virtualization means the ability to run virtualized systems inside other virtualized environments — needed for OcNOS to behave like a router inside a Docker container.
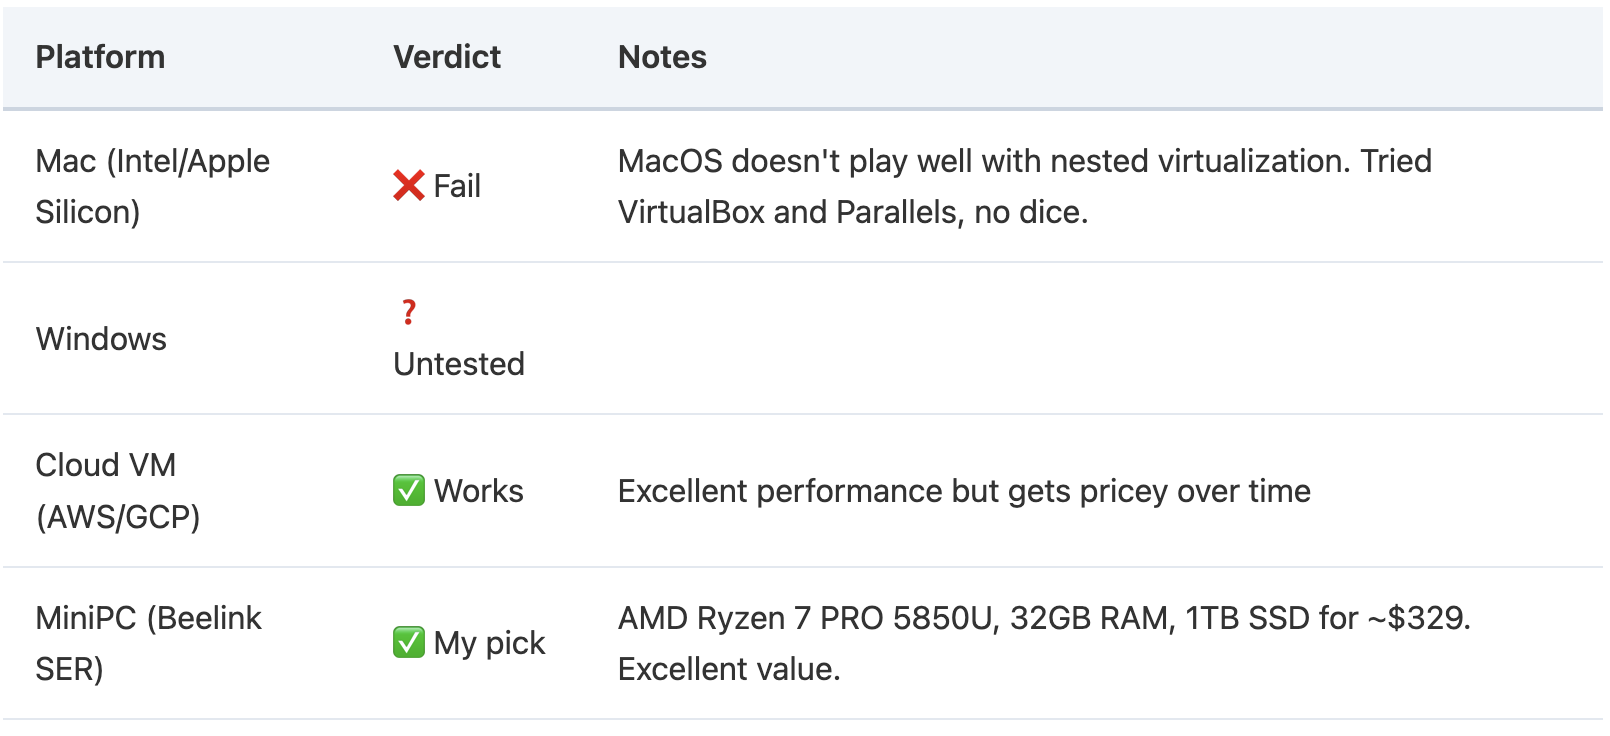
2. Hardware Choices: What Worked (and Didn’t)
 My criteria: Must support nested virtualization, at least 6+ cores, and 32GB RAM to spin up multiple nodes. Had to be portable and under $400. This Beelink MiniPC fit perfectly.
3. OS Selection

I landed on Ubuntu after testing a few Linux flavors. The community support and compatibility made everything smoother.
4. Converting OcNOS for ContainerLab
ContainerLab needs Docker images, but OcNOS comes as a .qcow2 virtual disk. Enter vrnetlab: a tool that wraps VM images into containerized form.
Steps:
- Clone vrnetlab and use vr-vm-base as a template.
- Build a Dockerfile that wraps the OcNOS image.
- Run docker build -t vrnetlab/ocnos .
- Tag the image (e.g., vrnetlab/ocnos:latest) so ContainerLab can find it.
5. Installing ContainerLab
Install via official script:
$ bash -c "$(curl -sL https://get.containerlab.dev)"Verify with:
$ containerlab version6. Launching and Inspecting the Lab
Once you’ve defined your topology file, launch your lab with:
$ sudo containerlab deploy -t <your-topo>.ymlThen check the status:
$ sudo containerlab inspect
INFO Parsing & checking topology file=srlceos01.clab.yml

+----------------------+-------------------------+--------+----------------+
|         Name         |        Kind/Image       | State  | IPv4/6 Address |
+----------------------+-------------------------+--------+----------------+
| clab-srlceos01-ocnos1| ipinfusion_ocnos        | running| 172.20.20.3    |
|                      | docker.io/vrnetlab/ipinfusion_ocnos:6.6.0-248     | 3fff:172:20:20::3 |
| clab-srlceos01-ocnos2| ipinfusion_ocnos        | running| 172.20.20.5    |
|                      | docker.io/vrnetlab/ipinfusion_ocnos:6.6.0-248     | 3fff:172:20:20::5 |
| clab-srlceos01-srl   | nokia_srllinux          | running| 172.20.20.2    |
|                      | ghcr.io/nokia/srlinux:24.3.3                      | 3fff:172:20:20::2 |
| clab-srlceos01-srl2  | nokia_srllinux          | running| 172.20.20.4    |
|                      | ghcr.io/nokia/srlinux:24.3.3                      | 3fff:172:20:20::4 |
+----------------------+-------------------------+--------+----------------+
You’ll see a table of nodes, container states, and assigned IPs — here showing 2 OcNOS nodes and 2 SR-Linux nodes running.
7. Logging into OcNOS and Validating Boot
Once your containers are up, SSH into your OcNOS nodes. Here’s the result from a successful login:
ocnos1# show version
Software version: OCNOS-SP-PLUS-x86-6.6.0-GA 03/24/2025 05:49:09
Copyright (C) 2025 IP Infusion. All rights reserved

Software Product: OCNOS-SP, Version: 6.6.0
Build Number: 248
Release: GA
Hardware Model:
Software Feature Code: PLUS-x86
Software Baseline Version: 6.5.2-48
ocnos1#
Run:
ocnos1# show version

ocnos1# show ip interface brief
You’ll see version information and interface status:
ocnos1# show ip interface brief

** address is assigned by dhcp client

Interface      IP-Address           Admin-Status    Link-Status
eth0           <10.0.1.1>           up              up
eth1                    up              up
lo             127.0.0.1            up              up
ocnos1#
8. Configuring OcNOS Inside the Lab
The goal here was to enable IS-IS with MPLS Traffic Engineering and Segment Routing. Here’s a full session including an error, troubleshooting, and the corrected config.
Step 1: Attempting MPLS TE Config — and Failing
ocnos1(config)# router isis 1
ocnos1(config-router)# mpls traffic-eng ?
  ipv6        Internet Protocol (IP)
  level-1     level-1
  level-2     level-2
  router-id   Traffic Engineering stable IP address for system

ocnos1(config-router)# mpls traffic-eng level-1
ocnos1(config-router)# mpls traffic-eng level-2
ocnos1(config-router)# exit
ocnos1(config)# commit
%% SRGB range must be within global SRGB range <16000-23999> -  /isis/isis-instances/isis-instance[instance='1']/segment-routing/config/instance
% Failed to commit .. As error(s) encountered during commit operation...
  Uncommitted configurations are retained in the current transaction session, check 'show transaction current'.
  Correct the reason for the failure and re-issue the commit.
  Use 'abort transaction' to terminate current transaction session and discard all uncommitted changes.
SMI error with info
The commit failed because the SRGB block was not in the valid range.
Step 2: Fixing with Correct SRGB Range
ocnos1(config)# router isis 1
ocnos1(config-router)# isis segment-routing global block 16000 20000
ocnos1(config-router)# exit
ocnos1(config)# commit
ocnos1(config)# exit
ocnos1# show running-config isis
!
!
router isis 1
 capability flex-algo routing
 metric-style wide
 mpls traffic-eng level-1
 mpls traffic-eng level-2
 isis segment-routing global block 16000 20000
 segment-routing mpls
!
Additional information:
Help details of IS-IS parameters:

Configure IS-IS router-id flex-algo index 1
R1(config-if)# prefix-sid algorithm-num 128 index 1201
R1(config-if)# prefix-sid algorithm-num 129 index 1301
R1(config-if)# exit

Configure the new SRGB(SRGB range:
R1(config-router)# isis segment-routing global block 20000 30000

Help details of Flex-Algo parameters:
- Default range if unconfigured = 16000-23999
Final Thoughts
This setup proves you don’t need a $5K lab to explore modern NOS platforms. ContainerLab + vrnetlab + a miniPC is more than enough to:
- Learn OcNOS features
- Experiment with segment routing, Flex-Algo, and SR-MPLS
- Run real-world topologies from the comfort of home
If you’re a network engineer looking to learn with hands-on tools, this route is affordable and powerful.
Questions or want the sample topo.yml I used? Drop a comment or ping me on LinkedIn.
 Abhijeet Prabhune is Chief Customer Success Officer for IP Infusion.
